> ## Documentation Index
> Fetch the complete documentation index at: https://docs.fentufsm.com/llms.txt
> Use this file to discover all available pages before exploring further.
# Document Templates
> Create customizable document templates with dynamic mail merge fields
## Overview
The Document Templates feature allows you to create professional document templates with dynamic content that pulls data from your Fentu FSM system. Using mail merge functionality, you can design templates for invoices, work order reports, service contracts, quotations, and any other documents your business needs.
Document Templates use **mail merge** technology - insert placeholder fields that automatically populate with real data when you generate documents, ensuring consistent, professional output every time.
## When to Use Document Templates
Use Document Templates to create:
* Work order completion reports for customers
* Invoice and quotation templates
* Service contract documents
* Technician assignment sheets
* Customer service summaries
* Equipment maintenance reports
* Parts inventory reports
* Custom branded documents with company information
## Document Templates Views
The Document Templates feature has three distinct views:
### 1. List View - Template Management
 The List View shows all your document templates in a table format:
| Element | Description |
| ----------------------------- | ------------------------------------------------------------------ |
| **Document Templates Header** | Page title and navigation |
| **Search Box** | Filter templates by name |
| **Template Table** | Lists all templates with columns for name and actions |
| **Template Name Column** | Click to view template details |
| **Actions Column** | Edit button (blue pencil icon) and Delete button (red trash icon) |
| **Pagination** | Navigate through pages if you have many templates |
| **Rows Per Page** | Dropdown to select how many templates to show (5, 10, 25, 50, 100) |
Click on a template name to view its details, or click the blue edit icon to open the editor.
### 2. View Mode - Template Details
The List View shows all your document templates in a table format:
| Element | Description |
| ----------------------------- | ------------------------------------------------------------------ |
| **Document Templates Header** | Page title and navigation |
| **Search Box** | Filter templates by name |
| **Template Table** | Lists all templates with columns for name and actions |
| **Template Name Column** | Click to view template details |
| **Actions Column** | Edit button (blue pencil icon) and Delete button (red trash icon) |
| **Pagination** | Navigate through pages if you have many templates |
| **Rows Per Page** | Dropdown to select how many templates to show (5, 10, 25, 50, 100) |
Click on a template name to view its details, or click the blue edit icon to open the editor.
### 2. View Mode - Template Details
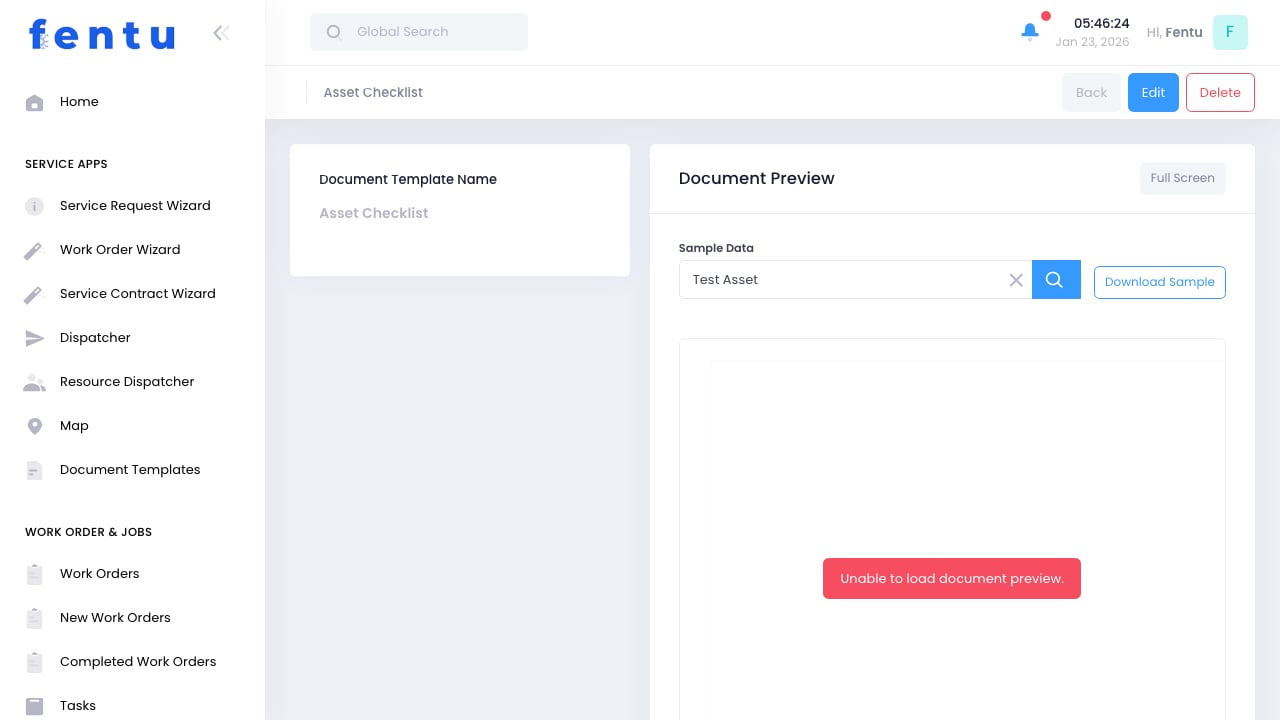 When you click on a template name from the list, you see a read-only view showing:
* Template name and configuration
* Object module
* Document preview
* Template structure and merge fields
This mode lets you review template content without accidentally making changes.
### 3. Edit Mode - Template Editor
When you click on a template name from the list, you see a read-only view showing:
* Template name and configuration
* Object module
* Document preview
* Template structure and merge fields
This mode lets you review template content without accidentally making changes.
### 3. Edit Mode - Template Editor
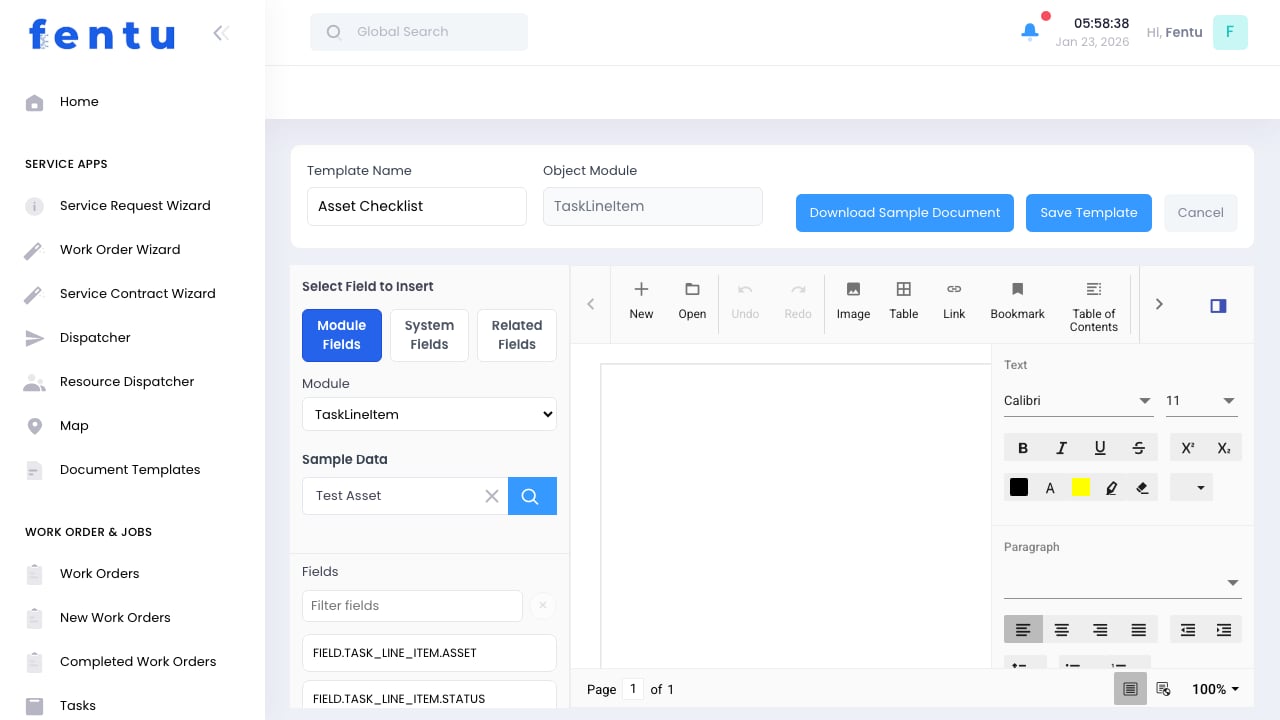 When you click the **Edit button** (blue pencil icon) from the list or create a new template, you enter the comprehensive template editor with four main areas:
1. **Template Header** (Top) - Template name, module selection, and action buttons
2. **Field Insert Panel** (Left) - Browse and insert merge fields from three organized tabs
3. **Document Editor** (Center) - Full-featured Syncfusion word processor
4. **Editor Toolbar** (Top of Editor) - Advanced formatting and document tools
### Navigating Between Views
Navigate to Document Templates from the main menu (Service Apps section)
From the list, click on any template name to view its details in read-only mode
From the list, click the blue edit icon (pencil) to open the template editor
Click "Cancel" from the editor or use the Document Templates menu item to return to the list
The **View Mode** is perfect for reviewing templates without risk of accidental changes. Use **Edit Mode** when you need to make modifications.
***
## Edit Mode - Interface Details
The template editor provides a professional document design experience with multiple panels working together:
#### Top Bar - Template Configuration
| Element | Description |
| ---------------------------- | --------------------------------------------------------------------------------------------------------- |
| **Template Name** | Editable text field for naming your template (e.g., "Work Order Completion Report") |
| **Object Module** | Read-only display showing which module this template pulls data from (set at creation, cannot be changed) |
| **Download Sample Document** | Generates a PDF using selected sample data to preview how the template looks with real information |
| **Save Template** | Saves your template design, merge fields, and configuration to the system |
| **Cancel** | Discards unsaved changes and returns to the template list |
The Object Module field is read-only after template creation. This ensures data integrity and prevents breaking merge field references.
#### Left Panel - "Select Field to Insert"
The left panel organizes all available merge fields into three tabs, making it easy to find and insert the data you need:
**Three Main Tabs:**
1. **Module Fields Tab** - Fields from your selected Object Module and other available modules
2. **System Fields Tab** - Dynamic system-generated fields like dates and current user information
3. **Related Fields Tab** - Fields from modules related to your Object Module
**Module Fields Tab Components:**
| Component | Function |
| ----------------------- | ------------------------------------------------------------------------------ |
| **Module Dropdown** | Select which module's fields to browse (defaults to Object Module) |
| **Sample Data Section** | Choose a sample record from your data to test merge field output |
| **Fields Label** | Header indicating the field list section |
| **Field Search Box** | Filter/search fields by name or label to quickly find specific fields |
| **Clear Button (×)** | Clears the search filter to show all fields again |
| **Field List** | Scrollable list of all available fields for the selected module |
| **Field Buttons** | Click any field to insert its placeholder at the cursor position in the editor |
Use the Sample Data lookup to select a real record from your system. When you click "Download Sample Document", the template will be populated with this record's actual data, allowing you to test how merge fields render.
**System Fields Tab Sections:**
The System Fields tab groups related fields into sections:
| Section | Fields Available |
| ---------------- | -------------------------------------------------------------------------------- |
| **Date & Time** | Current Date, Current Time, Current Date & Time, Current Year |
| **Current User** | User Full Name, User Email, User Phone, User Job Title, User Department, User ID |
Each field button displays:
* **Label** - Descriptive name (e.g., "Current Date")
* **Placeholder** - Actual merge code (e.g., ``)
**Related Fields Tab Components:**
| Component | Function |
| -------------------------------- | ---------------------------------------------------------------- |
| **Related Lists Dropdown** | Select which related module to pull fields from |
| **Insert Relation Table Marker** | Creates a table placeholder that repeats for each related record |
| **Fields Label** | Header for the related field list |
| **Field Search Box** | Filter related fields by name or label |
| **Clear Button (×)** | Clears the related field search filter |
| **Field List** | Scrollable list of all fields from the selected related module |
Related fields use a different placeholder format: `` to distinguish them from main module fields.
#### Center - Document Editor (Syncfusion DocumentEditor)
The center area is a professional-grade word processor powered by Syncfusion's DocumentEditor component:
**Editor Features:**
* **Full Page View** - See exactly how your document will look when generated
* **WYSIWYG Editing** - What You See Is What You Get - design with confidence
* **Merge Field Insertion** - Click fields in the left panel to insert placeholders at cursor position
* **Rich Text Editing** - Type regular text, format content, and arrange layout
* **Page Indicator** - Shows current page and total page count at bottom of editor
* **Real-time Preview** - See merge field placeholders as they'll appear in the template
**How Merge Fields Work in the Editor:**
When you click a field in the left panel, the editor inserts a placeholder at your cursor position:
* Module fields: ``
* System fields: ``, ``
* Related fields: ``
* Related tables: ``
You can format these placeholders just like regular text (bold, color, alignment, etc.).
#### Top Toolbar - Document Tools
The toolbar above the editor provides advanced document creation features:
**File Operations:**
| Tool | Function |
| -------- | ------------------------------------------------------- |
| **New** | Create a new blank document |
| **Open** | Load a .doc, .docx, .rtf, or .sfdt file into the editor |
| **Undo** | Reverse the last action |
| **Redo** | Reapply an undone action |
**Content Insertion:**
| Tool | Function |
| ------------ | ------------------------------------------------------------ |
| **Image** | Insert images (company logos, diagrams, signatures) |
| **Table** | Create tables for structured data (parts lists, labor hours) |
| **Link** | Add hyperlinks to web pages or email addresses |
| **Bookmark** | Create bookmarks for navigation within long documents |
**Document Structure:**
| Tool | Function |
| --------------------- | ------------------------------------------------------ |
| **Table of Contents** | Generate automatic table of contents based on headings |
| **Header** | Add headers that appear at the top of every page |
| **Footer** | Add footers that appear at the bottom of every page |
| **Page Setup** | Configure page size, margins, and orientation |
| **Page Number** | Insert automatic page numbering |
| **Break** | Add page breaks, section breaks, or column breaks |
**Advanced Features:**
| Tool | Function |
| ------------------- | --------------------------------------- |
| **Insert Footnote** | Add footnotes at the bottom of the page |
| **Insert Endnote** | Add endnotes at the end of the document |
#### Right Panel - Text Formatting Toolbar
The right-side vertical toolbar provides quick access to common text formatting options:
**Font Formatting:**
| Tool | Function |
| ------------------------ | ---------------------------------------------- |
| **Font Family Dropdown** | Select typeface (Arial, Times New Roman, etc.) |
| **Font Size Dropdown** | Set text size (8pt, 10pt, 12pt, 14pt, etc.) |
**Style Buttons:**
| Button | Function |
| -------------------- | ------------------------- |
| **B (Bold)** | Make text bold |
| **I (Italic)** | Make text italic |
| **U (Underline)** | Underline text |
| **Strikethrough** | Add strikethrough effect |
| **Superscript (x²)** | Raise text above baseline |
| **Subscript (x₂)** | Lower text below baseline |
**Color Controls:**
| Tool | Function |
| ------------------- | -------------------------------- |
| **Text Color** | Change font color (color picker) |
| **Highlight Color** | Add background highlight to text |
**Paragraph Alignment:**
| Button | Function |
| --------------- | --------------------------------------------------- |
| **Align Left** | Left-align paragraph |
| **Center** | Center-align paragraph |
| **Align Right** | Right-align paragraph |
| **Justify** | Justify paragraph (align both left and right edges) |
**Indentation and Lists:**
| Tool | Function |
| ------------------- | -------------------- |
| **Decrease Indent** | Move paragraph left |
| **Increase Indent** | Move paragraph right |
| **Bullets** | Create bulleted list |
| **Numbering** | Create numbered list |
The right-side formatting toolbar provides one-click access to the most commonly used formatting options, while the top toolbar offers advanced document structure tools.
***
## Creating a New Template
Access Document Templates from the Service Apps section
Type a descriptive name (e.g., "Work Order Completion Report", "Service Invoice Template")
Choose which module this template pulls data from (Work Orders, Customers, Assets, etc.)
Use the document editor to create your template layout
Add dynamic fields that populate with real data
Click "Save Template" to store your template for reuse
***
## Template Header
### Template Name
Give your template a clear, descriptive name:
| Good Names | Poor Names |
| --------------------------------- | -------------- |
| "Work Order Completion Report" | "Template 1" |
| "Monthly Service Invoice" | "Doc" |
| "Equipment Maintenance Checklist" | "New Template" |
| "Customer Service Summary 2024" | "Untitled" |
Use naming conventions that indicate the template's purpose and which module it's for. This makes templates easy to find later.
### Object Module
The Object Module determines which type of data the template uses:
| Module | Use For |
| -------------------- | ---------------------------------------------------------------- |
| **Work Order** | Work order reports, completion summaries, technician assignments |
| **Customer** | Customer profiles, service histories, contact sheets |
| **Service Contract** | Contract documents, terms and conditions, renewal notices |
| **Asset** | Equipment reports, maintenance logs, asset inventories |
| **Invoice** | Billing documents, payment receipts, statements |
| **Quote** | Quotations, estimates, proposals |
You cannot change the Object Module after creating the template. Choose carefully based on what data you need to include.
### Action Buttons
| Button | Function |
| ---------------------------- | --------------------------------------------------- |
| **Save Template** | Saves your template design and merge fields |
| **Download Sample Document** | Generates a PDF using sample data to preview output |
| **Cancel** | Discards changes and returns to template list |
***
## Field Insert Panel
The left panel lets you insert dynamic merge fields into your template:
### Module Fields Tab
Insert fields from the selected Object Module:
Click "Module Fields" if not already active
Select which module's fields to insert (defaults to Object Module)
Use the search box to filter fields by name
Click any field to insert its placeholder at the cursor position
**Common Work Order Fields:**
* Work Order ID
* Customer Name
* Address
* Planned Date
* Status
* Type
* Description
* Priority
* Assigned Technician
**Example Usage:**
```
Work Order: <>
Customer: <>
Date: <>
Status: <>
```
Field placeholders use double angle brackets `<>`. When you generate a document, these are replaced with actual data.
### System Fields Tab
Insert system-generated information that's always available:
#### Date & Time Fields
| Field | Output |
| ----------------------- | ------------------------------------- |
| **Current Date** | Today's date (e.g., January 23, 2026) |
| **Current Time** | Current time (e.g., 14:30) |
| **Current Date & Time** | Combined date and time |
| **Current Year** | Current year (e.g., 2026) |
**Example Usage:**
```
Report Generated:
© Your Company Name
```
#### Current User Fields
| Field | Output |
| ------------------- | ---------------------- |
| **User Full Name** | Logged-in user's name |
| **User Email** | User's email address |
| **User Phone** | User's phone number |
| **User Job Title** | User's position |
| **User Department** | User's department |
| **User ID** | Unique user identifier |
**Example Usage:**
```
Prepared by:
Email:
Department:
```
System fields are perfect for document metadata, signatures, and tracking who generated a document and when.
### Related Fields Tab
Insert fields from related modules (e.g., Customer data when creating a Work Order template):
Click "Related Fields"
Select which related module to pull fields from (e.g., Customer for a Work Order template)
The panel shows all fields from that related module
Click to insert related field placeholders
**Example: Work Order Template with Customer Info**
```
Customer Name: <>
Customer Phone: <>
Customer Email: <>
Service Address: <>
```
Related fields let you create comprehensive documents without manually entering information that's already in the system.
***
## Document Editor
The center area is a full-featured word processor:
### Text Formatting
| Feature | Description |
| --------------------------- | ----------------------------- |
| **Font** | Choose typeface and size |
| **Bold, Italic, Underline** | Standard text styling |
| **Text Color** | Set font color |
| **Highlight** | Background color for text |
| **Alignment** | Left, center, right, justify |
| **Lists** | Bulleted and numbered lists |
| **Indentation** | Increase/decrease indentation |
### Advanced Features
Insert tables to organize data in rows and columns. Perfect for itemized lists, parts inventories, or time tracking.
**Use Cases:**
* Parts used in a repair
* Labor hours breakdown
* Service checklist items
* Pricing tables
Add your company logo, product images, diagrams, or signatures. Images can be resized and positioned anywhere in the document.
**Tips:**
* Add logo in header for branding
* Include equipment photos in service reports
* Insert signature blocks for approvals
Create headers and footers that appear on every page. Great for company info, page numbers, and document dates.
**Common Uses:**
* Company name and logo in header
* Page numbers in footer
* "Confidential" watermarks
* Document version info
Apply consistent styling throughout your template using predefined styles (Heading 1, Heading 2, Normal, etc.).
**Benefits:**
* Consistent look and feel
* Easy bulk formatting changes
* Professional appearance
### Inserting Merge Fields in Editor
1. **Position Cursor** - Click where you want the field
2. **Select Field** - Click a field in the Field Insert Panel
3. **Field Appears** - Placeholder inserts at cursor (e.g., `<>`)
4. **Format As Needed** - Apply bold, color, alignment to the placeholder
5. **Continue Designing** - Add more text and fields
Don't modify the placeholder text (e.g., changing `<>` to `<>`). This will break the merge functionality.
***
## Sample Document Generation
Test your template with real data before deploying:
### How to Generate a Sample
Choose a sample work order, customer, or record from your system
Button becomes enabled once a sample record is selected
Opens a PDF with your template populated with actual data from the sample record
Verify all placeholders replaced correctly with real information
Return to editor to adjust layout, add missing fields, or fix formatting
Always generate a sample document before saving your template. This catches formatting issues, missing fields, and layout problems before you use the template in production.
### What to Check in Sample Documents
Ensure all placeholders were replaced with actual data (no `<>` visible)
Check that text alignment, fonts, and spacing look professional
Verify tables, images, and sections are positioned correctly
Confirm multi-page documents break naturally, not mid-section
***
## Example Templates
### Work Order Completion Report
```
WORK ORDER COMPLETION REPORT
Work Order #: <>
Date Completed:
CUSTOMER INFORMATION
Name: <>
Address: <>
Phone: <>
WORK PERFORMED
Type: <>
Description: <>
Technician: <>
Status: <>
Completed by:
Date:
```
### Service Invoice Template
```
INVOICE
Invoice Date:
Customer: <>
Address: <>
Work Order: <>
Service Date: <>
Service Type: <>
Description:
<>
Parts Used:
[TABLE with parts, quantities, prices]
Labor:
[TABLE with hours, rates]
Total: $<>
Payment Terms: Net 30
Company Logo [IMAGE]
```
### Equipment Maintenance Report
```
EQUIPMENT MAINTENANCE REPORT
Asset: <>
Serial Number: <>
Location: <>
Maintenance Date:
Technician:
Maintenance Performed:
<>
Parts Replaced:
<>
Next Maintenance Due: <>
Technician Signature: _________________
```
***
## Tips and Best Practices
Use clear headings, sections, and white space. Documents should be easy to scan and understand at a glance.
Generate samples using different work orders, customers, etc. to ensure your template handles various data scenarios (long text, missing fields, etc.).
Add your logo, company colors, and branded header/footer to every template for professional, consistent output.
When displaying multiple items (parts, tasks, hours), use tables instead of paragraphs for better readability.
Include generation date, user who created the document, and timestamps for audit trails and record-keeping.
Use clear, specific names so other users can find the right template quickly: "Monthly Maintenance Invoice" not "Template 3".
Include version numbers or dates in template names if you update them frequently: "Service Contract v2.1".
Many users will view PDFs on phones or tablets. Use readable fonts (12pt+) and avoid tiny tables or dense text.
***
## Common Questions
No, each template is tied to a specific Object Module selected at creation. If you need similar templates for Work Orders and Service Contracts, you must create separate templates for each.
If a work order doesn't have data for a field (e.g., no description), the placeholder will be replaced with blank space. Design your template to handle optional fields gracefully.
Currently, images must be static (added during template design). Dynamic images from work orders or assets are not supported. You can add placeholders for users to manually insert images after generation.
Navigate to the Document Templates list, find your template, and click "Edit". Your template loads in the editor where you can make changes and save.
Yes! Once saved, templates are available to all users with appropriate permissions. This ensures consistent document formatting across your organization.
Documents are generated as PDFs, which ensures consistent formatting and prevents editing after generation. PDFs can be emailed, printed, or stored in records.
Advanced conditional logic (e.g., "if priority is high, show this text") is not currently supported. All merge fields are included in every generated document.
From the Document Templates list view, select the template and use the delete option. Be cautious - deleted templates cannot be recovered.
***
## Related Documentation
Learn about work order data available for templates
Create contract templates with service agreement data
Understanding customer data for mail merge
Equipment and asset information for templates
When you click the **Edit button** (blue pencil icon) from the list or create a new template, you enter the comprehensive template editor with four main areas:
1. **Template Header** (Top) - Template name, module selection, and action buttons
2. **Field Insert Panel** (Left) - Browse and insert merge fields from three organized tabs
3. **Document Editor** (Center) - Full-featured Syncfusion word processor
4. **Editor Toolbar** (Top of Editor) - Advanced formatting and document tools
### Navigating Between Views
Navigate to Document Templates from the main menu (Service Apps section)
From the list, click on any template name to view its details in read-only mode
From the list, click the blue edit icon (pencil) to open the template editor
Click "Cancel" from the editor or use the Document Templates menu item to return to the list
The **View Mode** is perfect for reviewing templates without risk of accidental changes. Use **Edit Mode** when you need to make modifications.
***
## Edit Mode - Interface Details
The template editor provides a professional document design experience with multiple panels working together:
#### Top Bar - Template Configuration
| Element | Description |
| ---------------------------- | --------------------------------------------------------------------------------------------------------- |
| **Template Name** | Editable text field for naming your template (e.g., "Work Order Completion Report") |
| **Object Module** | Read-only display showing which module this template pulls data from (set at creation, cannot be changed) |
| **Download Sample Document** | Generates a PDF using selected sample data to preview how the template looks with real information |
| **Save Template** | Saves your template design, merge fields, and configuration to the system |
| **Cancel** | Discards unsaved changes and returns to the template list |
The Object Module field is read-only after template creation. This ensures data integrity and prevents breaking merge field references.
#### Left Panel - "Select Field to Insert"
The left panel organizes all available merge fields into three tabs, making it easy to find and insert the data you need:
**Three Main Tabs:**
1. **Module Fields Tab** - Fields from your selected Object Module and other available modules
2. **System Fields Tab** - Dynamic system-generated fields like dates and current user information
3. **Related Fields Tab** - Fields from modules related to your Object Module
**Module Fields Tab Components:**
| Component | Function |
| ----------------------- | ------------------------------------------------------------------------------ |
| **Module Dropdown** | Select which module's fields to browse (defaults to Object Module) |
| **Sample Data Section** | Choose a sample record from your data to test merge field output |
| **Fields Label** | Header indicating the field list section |
| **Field Search Box** | Filter/search fields by name or label to quickly find specific fields |
| **Clear Button (×)** | Clears the search filter to show all fields again |
| **Field List** | Scrollable list of all available fields for the selected module |
| **Field Buttons** | Click any field to insert its placeholder at the cursor position in the editor |
Use the Sample Data lookup to select a real record from your system. When you click "Download Sample Document", the template will be populated with this record's actual data, allowing you to test how merge fields render.
**System Fields Tab Sections:**
The System Fields tab groups related fields into sections:
| Section | Fields Available |
| ---------------- | -------------------------------------------------------------------------------- |
| **Date & Time** | Current Date, Current Time, Current Date & Time, Current Year |
| **Current User** | User Full Name, User Email, User Phone, User Job Title, User Department, User ID |
Each field button displays:
* **Label** - Descriptive name (e.g., "Current Date")
* **Placeholder** - Actual merge code (e.g., ``)
**Related Fields Tab Components:**
| Component | Function |
| -------------------------------- | ---------------------------------------------------------------- |
| **Related Lists Dropdown** | Select which related module to pull fields from |
| **Insert Relation Table Marker** | Creates a table placeholder that repeats for each related record |
| **Fields Label** | Header for the related field list |
| **Field Search Box** | Filter related fields by name or label |
| **Clear Button (×)** | Clears the related field search filter |
| **Field List** | Scrollable list of all fields from the selected related module |
Related fields use a different placeholder format: `` to distinguish them from main module fields.
#### Center - Document Editor (Syncfusion DocumentEditor)
The center area is a professional-grade word processor powered by Syncfusion's DocumentEditor component:
**Editor Features:**
* **Full Page View** - See exactly how your document will look when generated
* **WYSIWYG Editing** - What You See Is What You Get - design with confidence
* **Merge Field Insertion** - Click fields in the left panel to insert placeholders at cursor position
* **Rich Text Editing** - Type regular text, format content, and arrange layout
* **Page Indicator** - Shows current page and total page count at bottom of editor
* **Real-time Preview** - See merge field placeholders as they'll appear in the template
**How Merge Fields Work in the Editor:**
When you click a field in the left panel, the editor inserts a placeholder at your cursor position:
* Module fields: ``
* System fields: ``, ``
* Related fields: ``
* Related tables: ``
You can format these placeholders just like regular text (bold, color, alignment, etc.).
#### Top Toolbar - Document Tools
The toolbar above the editor provides advanced document creation features:
**File Operations:**
| Tool | Function |
| -------- | ------------------------------------------------------- |
| **New** | Create a new blank document |
| **Open** | Load a .doc, .docx, .rtf, or .sfdt file into the editor |
| **Undo** | Reverse the last action |
| **Redo** | Reapply an undone action |
**Content Insertion:**
| Tool | Function |
| ------------ | ------------------------------------------------------------ |
| **Image** | Insert images (company logos, diagrams, signatures) |
| **Table** | Create tables for structured data (parts lists, labor hours) |
| **Link** | Add hyperlinks to web pages or email addresses |
| **Bookmark** | Create bookmarks for navigation within long documents |
**Document Structure:**
| Tool | Function |
| --------------------- | ------------------------------------------------------ |
| **Table of Contents** | Generate automatic table of contents based on headings |
| **Header** | Add headers that appear at the top of every page |
| **Footer** | Add footers that appear at the bottom of every page |
| **Page Setup** | Configure page size, margins, and orientation |
| **Page Number** | Insert automatic page numbering |
| **Break** | Add page breaks, section breaks, or column breaks |
**Advanced Features:**
| Tool | Function |
| ------------------- | --------------------------------------- |
| **Insert Footnote** | Add footnotes at the bottom of the page |
| **Insert Endnote** | Add endnotes at the end of the document |
#### Right Panel - Text Formatting Toolbar
The right-side vertical toolbar provides quick access to common text formatting options:
**Font Formatting:**
| Tool | Function |
| ------------------------ | ---------------------------------------------- |
| **Font Family Dropdown** | Select typeface (Arial, Times New Roman, etc.) |
| **Font Size Dropdown** | Set text size (8pt, 10pt, 12pt, 14pt, etc.) |
**Style Buttons:**
| Button | Function |
| -------------------- | ------------------------- |
| **B (Bold)** | Make text bold |
| **I (Italic)** | Make text italic |
| **U (Underline)** | Underline text |
| **Strikethrough** | Add strikethrough effect |
| **Superscript (x²)** | Raise text above baseline |
| **Subscript (x₂)** | Lower text below baseline |
**Color Controls:**
| Tool | Function |
| ------------------- | -------------------------------- |
| **Text Color** | Change font color (color picker) |
| **Highlight Color** | Add background highlight to text |
**Paragraph Alignment:**
| Button | Function |
| --------------- | --------------------------------------------------- |
| **Align Left** | Left-align paragraph |
| **Center** | Center-align paragraph |
| **Align Right** | Right-align paragraph |
| **Justify** | Justify paragraph (align both left and right edges) |
**Indentation and Lists:**
| Tool | Function |
| ------------------- | -------------------- |
| **Decrease Indent** | Move paragraph left |
| **Increase Indent** | Move paragraph right |
| **Bullets** | Create bulleted list |
| **Numbering** | Create numbered list |
The right-side formatting toolbar provides one-click access to the most commonly used formatting options, while the top toolbar offers advanced document structure tools.
***
## Creating a New Template
Access Document Templates from the Service Apps section
Type a descriptive name (e.g., "Work Order Completion Report", "Service Invoice Template")
Choose which module this template pulls data from (Work Orders, Customers, Assets, etc.)
Use the document editor to create your template layout
Add dynamic fields that populate with real data
Click "Save Template" to store your template for reuse
***
## Template Header
### Template Name
Give your template a clear, descriptive name:
| Good Names | Poor Names |
| --------------------------------- | -------------- |
| "Work Order Completion Report" | "Template 1" |
| "Monthly Service Invoice" | "Doc" |
| "Equipment Maintenance Checklist" | "New Template" |
| "Customer Service Summary 2024" | "Untitled" |
Use naming conventions that indicate the template's purpose and which module it's for. This makes templates easy to find later.
### Object Module
The Object Module determines which type of data the template uses:
| Module | Use For |
| -------------------- | ---------------------------------------------------------------- |
| **Work Order** | Work order reports, completion summaries, technician assignments |
| **Customer** | Customer profiles, service histories, contact sheets |
| **Service Contract** | Contract documents, terms and conditions, renewal notices |
| **Asset** | Equipment reports, maintenance logs, asset inventories |
| **Invoice** | Billing documents, payment receipts, statements |
| **Quote** | Quotations, estimates, proposals |
You cannot change the Object Module after creating the template. Choose carefully based on what data you need to include.
### Action Buttons
| Button | Function |
| ---------------------------- | --------------------------------------------------- |
| **Save Template** | Saves your template design and merge fields |
| **Download Sample Document** | Generates a PDF using sample data to preview output |
| **Cancel** | Discards changes and returns to template list |
***
## Field Insert Panel
The left panel lets you insert dynamic merge fields into your template:
### Module Fields Tab
Insert fields from the selected Object Module:
Click "Module Fields" if not already active
Select which module's fields to insert (defaults to Object Module)
Use the search box to filter fields by name
Click any field to insert its placeholder at the cursor position
**Common Work Order Fields:**
* Work Order ID
* Customer Name
* Address
* Planned Date
* Status
* Type
* Description
* Priority
* Assigned Technician
**Example Usage:**
```
Work Order: <>
Customer: <>
Date: <>
Status: <>
```
Field placeholders use double angle brackets `<>`. When you generate a document, these are replaced with actual data.
### System Fields Tab
Insert system-generated information that's always available:
#### Date & Time Fields
| Field | Output |
| ----------------------- | ------------------------------------- |
| **Current Date** | Today's date (e.g., January 23, 2026) |
| **Current Time** | Current time (e.g., 14:30) |
| **Current Date & Time** | Combined date and time |
| **Current Year** | Current year (e.g., 2026) |
**Example Usage:**
```
Report Generated:
© Your Company Name
```
#### Current User Fields
| Field | Output |
| ------------------- | ---------------------- |
| **User Full Name** | Logged-in user's name |
| **User Email** | User's email address |
| **User Phone** | User's phone number |
| **User Job Title** | User's position |
| **User Department** | User's department |
| **User ID** | Unique user identifier |
**Example Usage:**
```
Prepared by:
Email:
Department:
```
System fields are perfect for document metadata, signatures, and tracking who generated a document and when.
### Related Fields Tab
Insert fields from related modules (e.g., Customer data when creating a Work Order template):
Click "Related Fields"
Select which related module to pull fields from (e.g., Customer for a Work Order template)
The panel shows all fields from that related module
Click to insert related field placeholders
**Example: Work Order Template with Customer Info**
```
Customer Name: <>
Customer Phone: <>
Customer Email: <>
Service Address: <>
```
Related fields let you create comprehensive documents without manually entering information that's already in the system.
***
## Document Editor
The center area is a full-featured word processor:
### Text Formatting
| Feature | Description |
| --------------------------- | ----------------------------- |
| **Font** | Choose typeface and size |
| **Bold, Italic, Underline** | Standard text styling |
| **Text Color** | Set font color |
| **Highlight** | Background color for text |
| **Alignment** | Left, center, right, justify |
| **Lists** | Bulleted and numbered lists |
| **Indentation** | Increase/decrease indentation |
### Advanced Features
Insert tables to organize data in rows and columns. Perfect for itemized lists, parts inventories, or time tracking.
**Use Cases:**
* Parts used in a repair
* Labor hours breakdown
* Service checklist items
* Pricing tables
Add your company logo, product images, diagrams, or signatures. Images can be resized and positioned anywhere in the document.
**Tips:**
* Add logo in header for branding
* Include equipment photos in service reports
* Insert signature blocks for approvals
Create headers and footers that appear on every page. Great for company info, page numbers, and document dates.
**Common Uses:**
* Company name and logo in header
* Page numbers in footer
* "Confidential" watermarks
* Document version info
Apply consistent styling throughout your template using predefined styles (Heading 1, Heading 2, Normal, etc.).
**Benefits:**
* Consistent look and feel
* Easy bulk formatting changes
* Professional appearance
### Inserting Merge Fields in Editor
1. **Position Cursor** - Click where you want the field
2. **Select Field** - Click a field in the Field Insert Panel
3. **Field Appears** - Placeholder inserts at cursor (e.g., `<>`)
4. **Format As Needed** - Apply bold, color, alignment to the placeholder
5. **Continue Designing** - Add more text and fields
Don't modify the placeholder text (e.g., changing `<>` to `<>`). This will break the merge functionality.
***
## Sample Document Generation
Test your template with real data before deploying:
### How to Generate a Sample
Choose a sample work order, customer, or record from your system
Button becomes enabled once a sample record is selected
Opens a PDF with your template populated with actual data from the sample record
Verify all placeholders replaced correctly with real information
Return to editor to adjust layout, add missing fields, or fix formatting
Always generate a sample document before saving your template. This catches formatting issues, missing fields, and layout problems before you use the template in production.
### What to Check in Sample Documents
Ensure all placeholders were replaced with actual data (no `<>` visible)
Check that text alignment, fonts, and spacing look professional
Verify tables, images, and sections are positioned correctly
Confirm multi-page documents break naturally, not mid-section
***
## Example Templates
### Work Order Completion Report
```
WORK ORDER COMPLETION REPORT
Work Order #: <>
Date Completed:
CUSTOMER INFORMATION
Name: <>
Address: <>
Phone: <>
WORK PERFORMED
Type: <>
Description: <>
Technician: <>
Status: <>
Completed by:
Date:
```
### Service Invoice Template
```
INVOICE
Invoice Date:
Customer: <>
Address: <>
Work Order: <>
Service Date: <>
Service Type: <>
Description:
<>
Parts Used:
[TABLE with parts, quantities, prices]
Labor:
[TABLE with hours, rates]
Total: $<>
Payment Terms: Net 30
Company Logo [IMAGE]
```
### Equipment Maintenance Report
```
EQUIPMENT MAINTENANCE REPORT
Asset: <>
Serial Number: <>
Location: <>
Maintenance Date:
Technician:
Maintenance Performed:
<>
Parts Replaced:
<>
Next Maintenance Due: <>
Technician Signature: _________________
```
***
## Tips and Best Practices
Use clear headings, sections, and white space. Documents should be easy to scan and understand at a glance.
Generate samples using different work orders, customers, etc. to ensure your template handles various data scenarios (long text, missing fields, etc.).
Add your logo, company colors, and branded header/footer to every template for professional, consistent output.
When displaying multiple items (parts, tasks, hours), use tables instead of paragraphs for better readability.
Include generation date, user who created the document, and timestamps for audit trails and record-keeping.
Use clear, specific names so other users can find the right template quickly: "Monthly Maintenance Invoice" not "Template 3".
Include version numbers or dates in template names if you update them frequently: "Service Contract v2.1".
Many users will view PDFs on phones or tablets. Use readable fonts (12pt+) and avoid tiny tables or dense text.
***
## Common Questions
No, each template is tied to a specific Object Module selected at creation. If you need similar templates for Work Orders and Service Contracts, you must create separate templates for each.
If a work order doesn't have data for a field (e.g., no description), the placeholder will be replaced with blank space. Design your template to handle optional fields gracefully.
Currently, images must be static (added during template design). Dynamic images from work orders or assets are not supported. You can add placeholders for users to manually insert images after generation.
Navigate to the Document Templates list, find your template, and click "Edit". Your template loads in the editor where you can make changes and save.
Yes! Once saved, templates are available to all users with appropriate permissions. This ensures consistent document formatting across your organization.
Documents are generated as PDFs, which ensures consistent formatting and prevents editing after generation. PDFs can be emailed, printed, or stored in records.
Advanced conditional logic (e.g., "if priority is high, show this text") is not currently supported. All merge fields are included in every generated document.
From the Document Templates list view, select the template and use the delete option. Be cautious - deleted templates cannot be recovered.
***
## Related Documentation
Learn about work order data available for templates
Create contract templates with service agreement data
Understanding customer data for mail merge
Equipment and asset information for templates