> ## Documentation Index
> Fetch the complete documentation index at: https://docs.fentufsm.com/llms.txt
> Use this file to discover all available pages before exploring further.
# Service Request Wizard
> Create service requests step-by-step with our guided wizard
## Overview
The Creation Wizard is a combined setup flow that merges the Request Wizard and Work Order Wizard into a single guided process. It allows users to enter all relevant customer and service information once and decide how the record should be processed.
During creation, the user can choose one of the following outcomes:
* Create a **Request only**
* Create a **Request and a Quote**
* Create a **Request and a Work Order**
This enables flexible handling of service intake, commercial evaluation, and execution from a single entry point.
### **Behaviour Rules**
* If **Request + Quote** is selected, the Request status is automatically set to **Quote**
* If **Request + Work Order** is selected, the Request is automatically **closed**
* If only a Request is created, it remains open for further processing or later conversion
A **Service Request** is not yet a work order. It's a preliminary record that captures customer needs and can be converted into a work order when ready.
## When to Use the Service Request Wizard
Use this wizard when:
* A customer calls or emails with a service inquiry
* You need to log a customer complaint
* You want to document a service need before scheduling
* You need to create a quote before proceeding
* You need approval before creating a full work order
## The Step Process
Select the customer and location details
Add service request details, dates, and priority
Add specific details or tasks to be performed
Review and decide what shall happen after creation
***
## Step 1: Customer Information
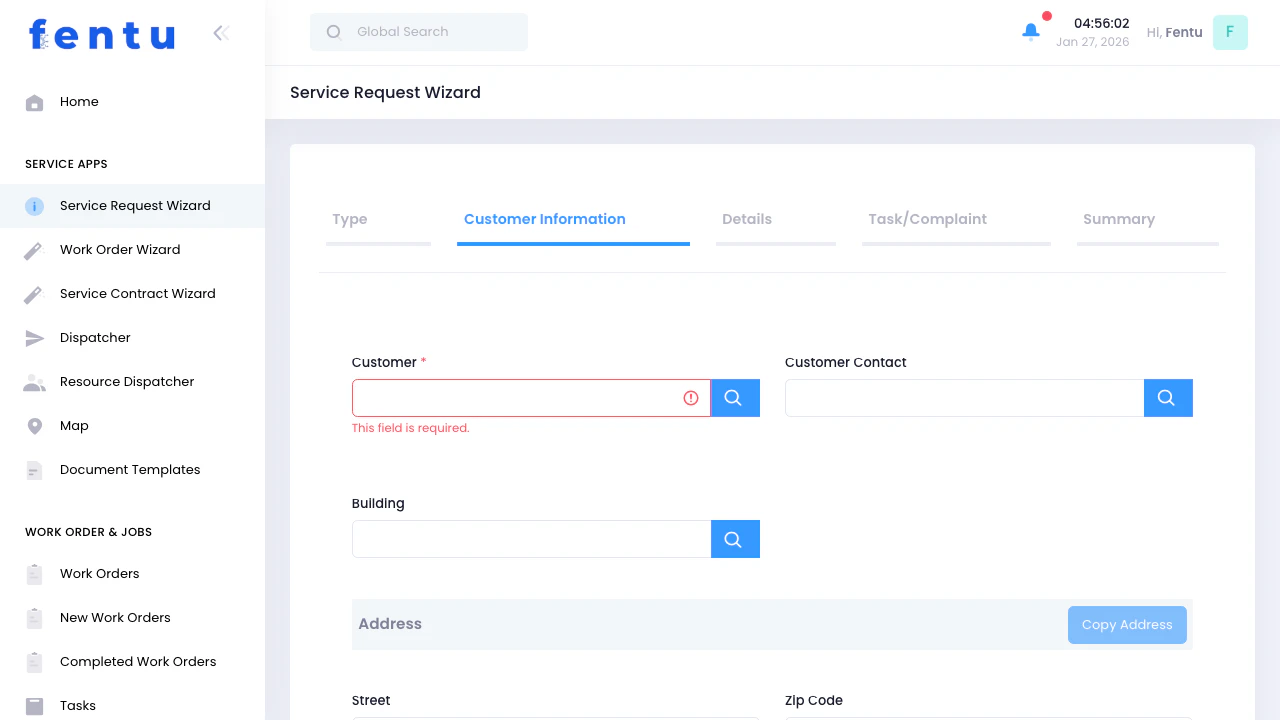 Enter or select customer and location information:
### Standard Fields
| Field | Description |
| -------------------- | ---------------------------------------------------- |
| **Customer** | Search and select the customer requesting service |
| **Contact** | Select the primary contact person for this request |
| **Location** | Choose the customer location where service is needed |
| **Location Contact** | Create or select the contact onsite |
### Address Information
The wizard will auto-populate address fields based on the selected location. You can also manually enter:
* Street address
* City
* State/Province
* ZIP/Postal code
If the customer, contact or location is not in the system yet, you'll need to create them first using the "new" function within the Wizard.
### Copy Address Feature
Click the **"Copy Address"** button to duplicate the building address if needed.
***
## Step 2: Overview
Enter or select customer and location information:
### Standard Fields
| Field | Description |
| -------------------- | ---------------------------------------------------- |
| **Customer** | Search and select the customer requesting service |
| **Contact** | Select the primary contact person for this request |
| **Location** | Choose the customer location where service is needed |
| **Location Contact** | Create or select the contact onsite |
### Address Information
The wizard will auto-populate address fields based on the selected location. You can also manually enter:
* Street address
* City
* State/Province
* ZIP/Postal code
If the customer, contact or location is not in the system yet, you'll need to create them first using the "new" function within the Wizard.
### Copy Address Feature
Click the **"Copy Address"** button to duplicate the building address if needed.
***
## Step 2: Overview
 Add service request details and scheduling information:
### Service Information
| Field | Description |
| --------------- | ------------------------------------------ |
| **Description** | Detailed description of the service needed |
| **Priority** | Set priority level (High, Medium, Low) |
### Scheduling
| Field | Description |
| -------------------- | ------------------------------------ |
| **Planned Date** | When the service should be performed |
| **Planned End Date** | Expected completion date/time |
| **Is Fixed Date** | Check if the date cannot be changed |
### Service Object and Resources
In this step, you can also add:
Add equipment or assets that need servicing. You can select multiple service objects from the customer's list.
Add products if this is an installation or delivery request.
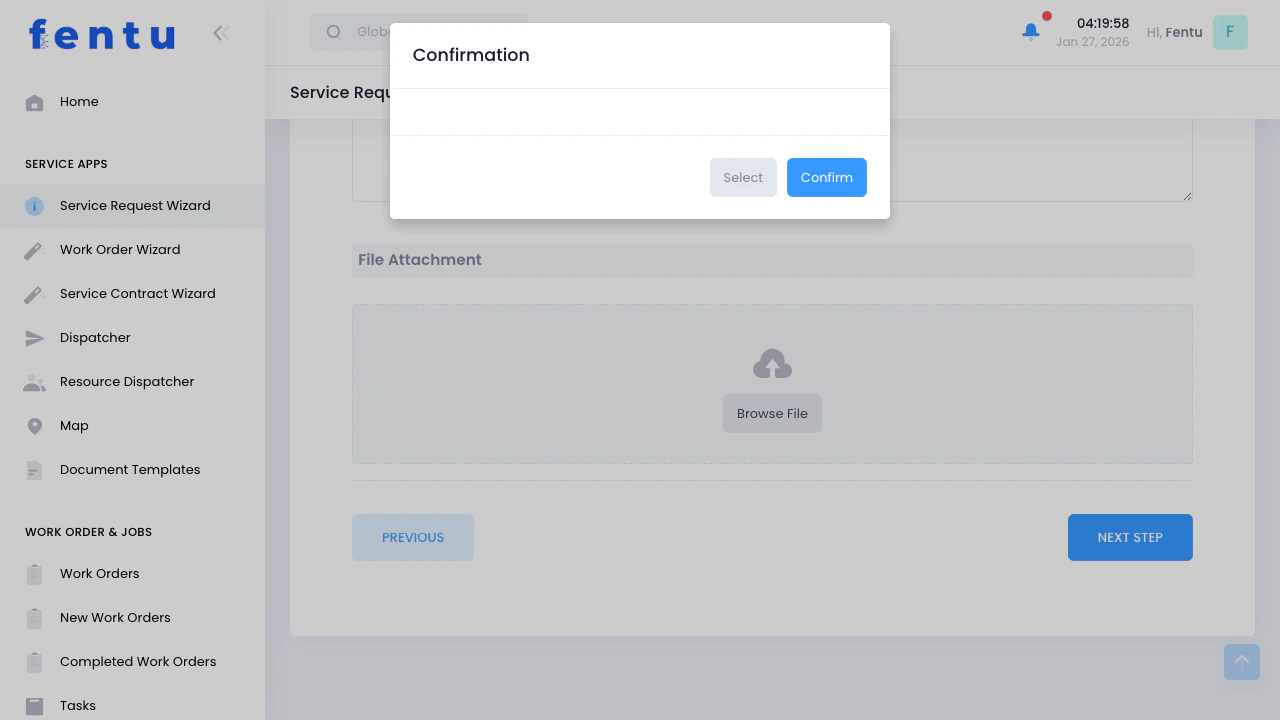
Attach any relevant documents, photos, or files to the service request.
At least one asset should be added before proceeding. If no assets are added, you'll receive a confirmation prompt asking if you want to continue without assets.
***
## Step 3: Complaint
Add service request details and scheduling information:
### Service Information
| Field | Description |
| --------------- | ------------------------------------------ |
| **Description** | Detailed description of the service needed |
| **Priority** | Set priority level (High, Medium, Low) |
### Scheduling
| Field | Description |
| -------------------- | ------------------------------------ |
| **Planned Date** | When the service should be performed |
| **Planned End Date** | Expected completion date/time |
| **Is Fixed Date** | Check if the date cannot be changed |
### Service Object and Resources
In this step, you can also add:
Add equipment or assets that need servicing. You can select multiple service objects from the customer's list.
Add products if this is an installation or delivery request.
Attach any relevant documents, photos, or files to the service request.
At least one asset should be added before proceeding. If no assets are added, you'll receive a confirmation prompt asking if you want to continue without assets.
***
## Step 3: Complaint
 Add specific complaints or tasks that need to be addressed:
### Adding Complaints
Click **"Add Complaint"** to create individual complaint records. For each complaint, you can specify:
| Field | Description |
| ------------------ | ---------------------------------------------- |
| **Name** | Brief name/title for the complaint |
| **Description** | Detailed description of the issue |
| **Service Object** | Which service object this complaint relates to |
| **Parts** | Parts that may be needed to resolve this |
| **Resources** | Technicians or teams to assign |
| **Checklists** | Quality or inspection checklists to use |
You can add multiple complaints to a single service request. This is useful when a customer has several issues to address.
### Validation
Each complaint must have:
* A unique name (cannot be empty)
***
## Step 4: Summary
Add specific complaints or tasks that need to be addressed:
### Adding Complaints
Click **"Add Complaint"** to create individual complaint records. For each complaint, you can specify:
| Field | Description |
| ------------------ | ---------------------------------------------- |
| **Name** | Brief name/title for the complaint |
| **Description** | Detailed description of the issue |
| **Service Object** | Which service object this complaint relates to |
| **Parts** | Parts that may be needed to resolve this |
| **Resources** | Technicians or teams to assign |
| **Checklists** | Quality or inspection checklists to use |
You can add multiple complaints to a single service request. This is useful when a customer has several issues to address.
### Validation
Each complaint must have:
* A unique name (cannot be empty)
***
## Step 4: Summary
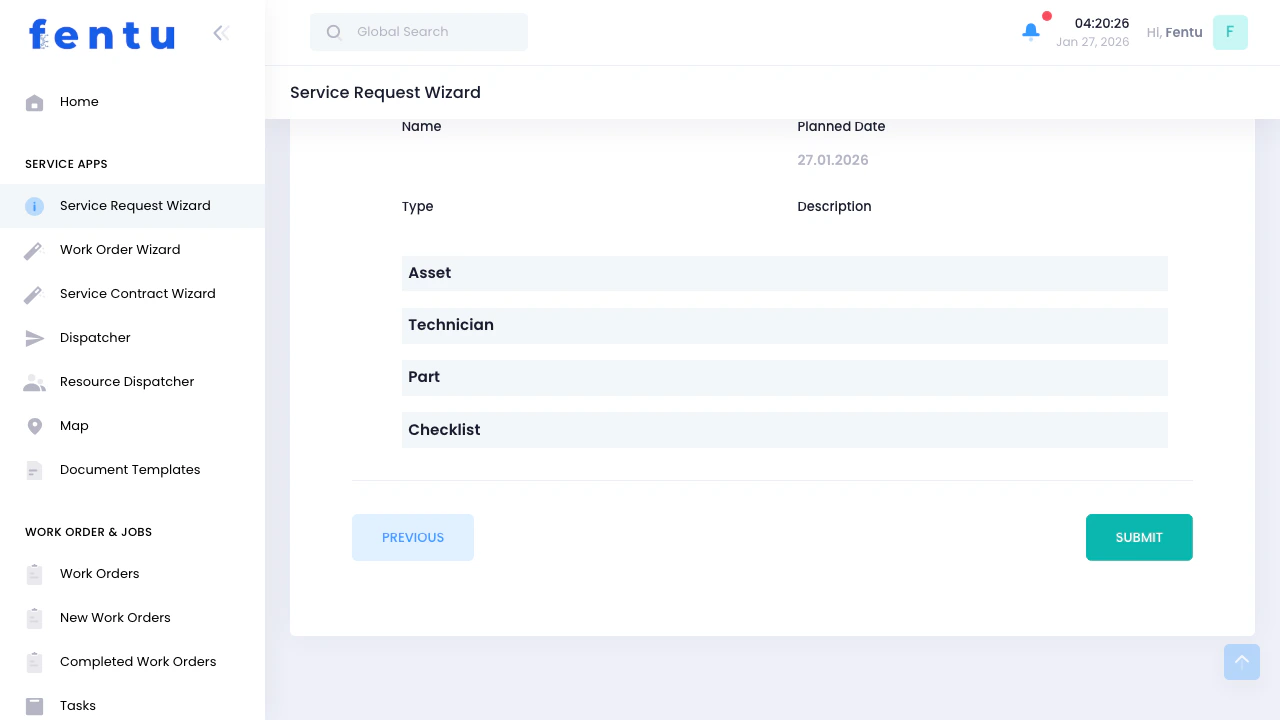 Review all information before submitting:
### What You'll See
* Service request type
* Customer and contact information
* Location and address
* Planned dates and priority
* List of assets
* All complaints and tasks
* Attached files
### Actions Available
Go back to edit any step
Create the service request
Discard and return to list
### After Submission
Once you click **"Submit"**, the service request will be created and saved. You'll see:
A confirmation that the service request was created successfully
The system assigns a unique ID to the service request
Options to convert to work order or view the service request list
***
## Tips and Best Practices
Make sure the customer, contacts, and buildings are set up in the system before starting the wizard. This saves time and ensures accurate data.
Adding service object in Step 2 makes it easier to link complaints to specific service objects in Step 3.
Write clear, detailed descriptions for each complaint. This helps technicians understand the issue before arriving on-site.
If the customer sends photos of the issue, attach them in Step 3. Visual documentation helps with diagnosis and planning.
Coordinate with the customer on dates before setting them as "Fixed Date" to avoid scheduling conflicts.
***
## Common Questions
A **Service Request** is a preliminary record that captures customer needs. A **Work Order** is a confirmed job that's scheduled and assigned to technicians. Service requests must be converted to work orders before work can begin.
Yes! Navigate to the Service Requests list, find your request, and click to edit. You can modify information before converting it to a work order.
No, complaints are optional. However, adding them provides more detail for technicians and helps with planning parts and resources.
You'll receive a warning prompt. You can choose to continue without service objects, but it's recommended to add them for better tracking and service history.
The wizard creates one service request at a time. For bulk creation, you may want to use the Import feature under System Administration.
***
## Related Documentation
Create work orders or convert Service Requests
Learn how to manage customer, contact and relted records
Understand tracking and maintenance
View and manage all service requests
Review all information before submitting:
### What You'll See
* Service request type
* Customer and contact information
* Location and address
* Planned dates and priority
* List of assets
* All complaints and tasks
* Attached files
### Actions Available
Go back to edit any step
Create the service request
Discard and return to list
### After Submission
Once you click **"Submit"**, the service request will be created and saved. You'll see:
A confirmation that the service request was created successfully
The system assigns a unique ID to the service request
Options to convert to work order or view the service request list
***
## Tips and Best Practices
Make sure the customer, contacts, and buildings are set up in the system before starting the wizard. This saves time and ensures accurate data.
Adding service object in Step 2 makes it easier to link complaints to specific service objects in Step 3.
Write clear, detailed descriptions for each complaint. This helps technicians understand the issue before arriving on-site.
If the customer sends photos of the issue, attach them in Step 3. Visual documentation helps with diagnosis and planning.
Coordinate with the customer on dates before setting them as "Fixed Date" to avoid scheduling conflicts.
***
## Common Questions
A **Service Request** is a preliminary record that captures customer needs. A **Work Order** is a confirmed job that's scheduled and assigned to technicians. Service requests must be converted to work orders before work can begin.
Yes! Navigate to the Service Requests list, find your request, and click to edit. You can modify information before converting it to a work order.
No, complaints are optional. However, adding them provides more detail for technicians and helps with planning parts and resources.
You'll receive a warning prompt. You can choose to continue without service objects, but it's recommended to add them for better tracking and service history.
The wizard creates one service request at a time. For bulk creation, you may want to use the Import feature under System Administration.
***
## Related Documentation
Create work orders or convert Service Requests
Learn how to manage customer, contact and relted records
Understand tracking and maintenance
View and manage all service requests