Overview
Asset Parts represent individual components that make up larger assets. By tracking parts separately, you can monitor component lifecycles, schedule part-specific maintenance, track replacements, and identify patterns in equipment failures.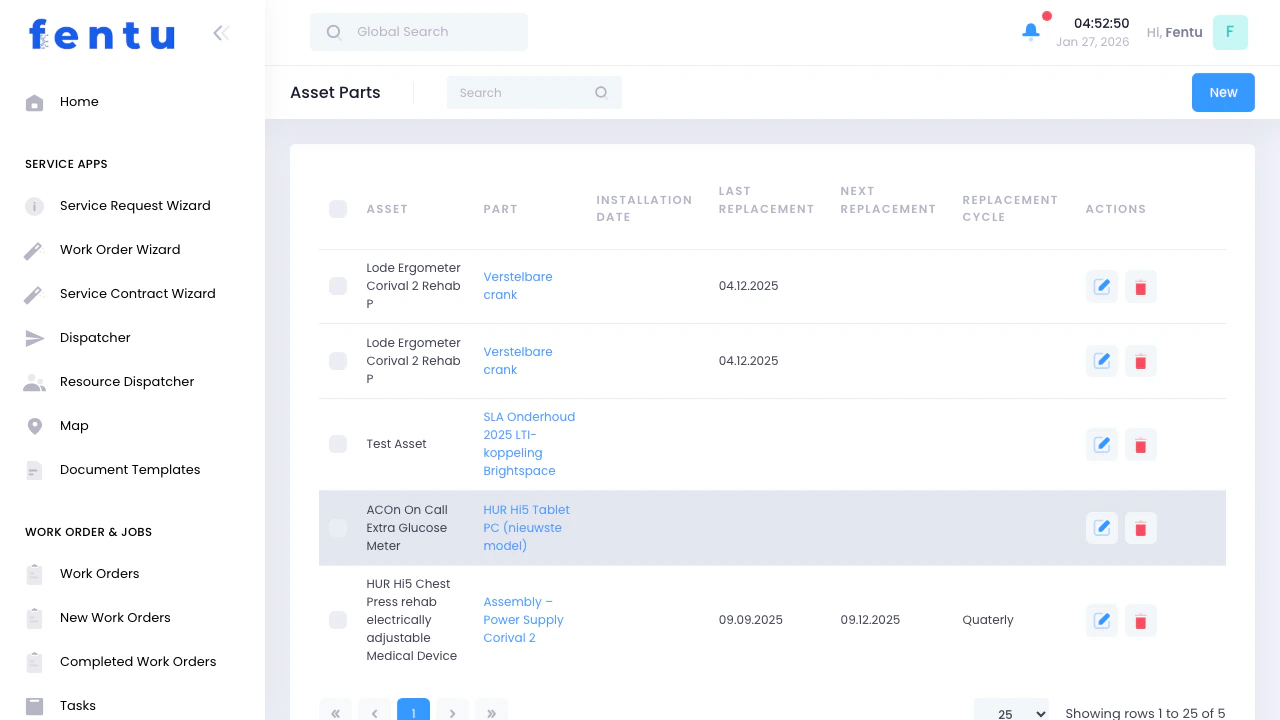
When to Use Asset Parts
Use the Asset Parts module when you need to:- Track major components of complex equipment
- Monitor component lifecycles and replacement intervals
- Schedule maintenance for specific parts
- Identify patterns in part failures
- Track warranty coverage for individual components
- Plan part replacements based on age and service history
- Manage inventory for frequently replaced components
Understanding Asset Parts
Part Hierarchy
- Customer: “Acme Corporation”
- Object: “Acme HQ Building”
- Asset: “Rooftop Machine Unit #1”
- Asset Part: “Compressor - Model ABC-123”
- Asset Part: “Evaporator Coil - 4 Ton”
- Asset Part: “Blower Motor - 1/2 HP”
- Asset Part: “Condenser Fan Motor - 1/4 HP”
- Asset: “Rooftop Machine Unit #1”
- Object: “Acme HQ Building”
When to Create Asset Parts
Create part records for:- Major Components - Expensive parts with independent service needs (compressors, motors, control boards)
- Warranty-Tracked Parts - Components with separate warranty coverage
- Frequently Replaced Parts - Items replaced on regular intervals (filters that cost tracking matters, wear parts)
- Critical Components - Parts whose failure causes equipment downtime (emergency replacement planning)
- Consumables replaced at every service (filters, belts unless tracking matters)
- Inexpensive, easily obtained parts
- Parts that are always replaced together with the parent asset
Asset Parts List View
Key Features
Branch Filtering
Branch Filtering
Asset Association
Asset Association
Replacement Tracking
Replacement Tracking
Warranty Status
Warranty Status
Inventory Links
Inventory Links
Asset Parts List Columns
| Column | Description |
|---|---|
| Part Name | Descriptive name for the component |
| Part | Links the Asset Part to a consumable Part in inventory |
| Serial Number | Component serial number (if applicable) |
| Manufacturer | Who makes this component (may differ from asset manufacturer) |
| Specifications | Key specs: horsepower, voltage, tonnage, capacity, size, etc. |
| Asset | Which asset this part belongs to |
| Type/Category | Type of part: Motor, Compressor, Control Board, Sensor, etc. |
| Status | Active, Replaced, Under Warranty, Failed |
| Installation Date | When this part was installed |
| Replacement Cycle | How often this part typically needs replacement |
| Next Replacement Due | Calculated based on expected life and installation date |
| Last Service | Most recent maintenance on this part |
| Warranty Expires | Warranty expiration date for this component |
| Expected Life | Expected lifespan based on manufacturer specs |
| Actions | View, edit, create work order, order replacement |
Creating a New Asset Part
Asset Part Information Fields
Basic Information
| Field | Description |
|---|---|
| Part Name | Descriptive name for the component. Be specific: “Compressor - Copeland Scroll 3 Ton” not just “Compressor”. Required field. |
| Part Code | Internal code or stock number if you maintain inventory. |
| Part Number | Manufacturer part number or model number. Critical for ordering exact replacements. |
| Serial Number | Component serial number if available. Some parts have individual serial numbers. |
| Asset | Which asset (parent equipment) this part belongs to. Required field. |
| Type/Category | Type of component: Compressor, Motor, Control Board, Sensor, Coil, Fan, Belt, Filter, etc. |
| Status | Current status: Active, Replaced, Failed, Under Warranty, Retired. |
Component Details
| Field | Description |
|---|---|
| Manufacturer | Who makes this component (may differ from asset manufacturer). |
| Brand | Brand name if different from manufacturer. |
| Model | Specific model designation for this component. |
| Specifications | Key specs: horsepower, voltage, tonnage, capacity, size, etc. |
| Material | Component material (copper, aluminum, steel, etc.) if relevant. |
Installation Information
| Field | Description |
|---|---|
| Installation Date | When this specific part was installed. For original parts, this is the asset installation date. For replacements, this is the replacement date. |
| Installed By | Technician or company who installed this part. |
| Installation Cost | Labor and material cost for installation (for replacement planning). |
| Original vs Replacement | Is this the original part from the asset or a replacement? |
Lifecycle Information
| Field | Description |
|---|---|
| Expected Life | Expected lifespan in years or hours of operation based on manufacturer specs. |
| Replacement Cycle | How often this part typically needs replacement: annually, every 2 years, every 5 years, based on runtime, etc. |
| Operating Hours | For parts tracked by runtime, record total operating hours. |
| Last Replacement Date | When this part was last replaced (if it’s been replaced multiple times). |
| Next Replacement Due | Calculated based on expected life and installation date. |
Warranty Information
| Field | Description |
|---|---|
| Warranty Start Date | When warranty coverage begins for this component. |
| Warranty End Date | When warranty expires. May differ from asset warranty. |
| Warranty Type | Parts only, labor included, or full coverage. |
| Warranty Provider | Manufacturer warranty or separate warranty company. |
| Warranty Document | Upload warranty certificate or terms. |
Inventory Connection
| Field | Description |
|---|---|
| Stock Item | Link to inventory stock item if you maintain parts inventory. |
| Reorder Point | When stock of this part reaches this level, trigger reorder. |
| Preferred Vendor | Which supplier you purchase this part from. |
| Lead Time | How long it takes to obtain this part (for emergency planning). |
| Cost | Standard replacement cost for this part. |
Maintenance Requirements
| Field | Description |
|---|---|
| Maintenance Schedule | How often this specific component needs service: Monthly, Quarterly, Annual, or based on operating hours. |
| Last Service Date | When this part was last serviced or inspected. |
| Next Service Due | When next maintenance is scheduled. |
| Service Notes | Special service procedures or requirements for this component. |
Technical Information
| Field | Description |
|---|---|
| Specifications Sheet | Upload technical spec sheet from manufacturer. |
| Wiring Diagram | Upload electrical diagrams if applicable. |
| Installation Manual | Installation instructions for this component. |
| Service Manual | Service and troubleshooting guide for this part. |
| Photos | Photos of the component, nameplate, and installation location. |
Notes
| Field | Description |
|---|---|
| Notes | Internal notes about this part. Document: common failure modes, special tools required, known issues, upgrade options, cross-reference part numbers from other manufacturers. |
| Replacement History | Track each time this part has been replaced: dates, reasons, costs. |
Common Asset Parts by Equipment Type
Machine Systems
Compressor
Compressor
Blower Motor
Blower Motor
Evaporator/Condenser Coils
Evaporator/Condenser Coils
Control Board
Control Board
Elevators
Motor/Drive System
Motor/Drive System
Controller
Controller
Door Operator
Door Operator
Electrical Systems
Generator
Generator
UPS Battery Bank
UPS Battery Bank
Transformer
Transformer
Part Status Management
Status Types
| Status | Description | When to Use |
|---|---|---|
| Active | Part is currently installed and operational | Normal operating state |
| Under Warranty | Part is installed and covered by active warranty | Warranty period |
| Replaced | Part has been removed and replaced | After replacement work order completed |
| Failed | Part has failed but not yet replaced | When equipment is down awaiting part |
| Retired | Part was removed when asset was retired | Asset decommissioned |
| Stock | Spare part in inventory, not yet installed | Pre-stocked replacement parts |
Tracking Replacements
When a part is replaced:- Update the old part status to “Replaced”
- Note the replacement date and reason for replacement
- Create a new part record for the replacement (or update installation date if tracking same part slot)
- Document replacement cost and labor hours
- Start new warranty period if applicable
Part Detail View
When you click on an asset part row in the list, you open the detailed view showing comprehensive information and additional features:Detail View Sections
Part Information
Part Information
- Part name and identification
- Type and category
- Approval numbers or certifications
- Installation date
- Replacement cycle information
- Last replacement date
- Next scheduled replacement
- Notes and remarks about replacement scheduling
Checklists
Checklists
- All checklists assigned to this part
- Checklist completion status
- Last time each checklist was completed
- Quick access to perform checklist inspections
History (Audit Trail)
History (Audit Trail)
- Date & Time - When the change occurred
- User - Who made the change
- Section - Which area of the record was changed
- Field Changed - Specific field that was modified
- Previous Value - What the value was before
- New Value - What it was changed to
- Status changes (Active → Replaced)
- Installation date updates
- Serial number corrections
- Warranty information changes
- Maintenance schedule adjustments
Benefits of Detail View Features
Compliance & Auditing
Preventive Maintenance
Troubleshooting
Training & Knowledge Transfer
Using Checklists Effectively
Create Standard Checklists
Assign to Parts
Schedule Inspections
Complete During Service
Asset Part Actions
From the List View
View Details
Edit Part
Create Work Order
Order Replacement
View Parent Asset
Replacement History
From the Detail View
When viewing a part’s detail page, you can:- Edit Part Information - Update any field including installation dates, warranty info, or specifications
- Manage Checklists - Add, remove, or complete inspection checklists associated with this part
- Perform Checklist Inspection - Complete assigned checklists directly from the part record
- Review Change History - View complete audit trail of all modifications to this part record
- Create Work Order - Generate a work order specifically for this part
- Link to Parent Asset - Navigate to the parent asset to see the complete equipment context
- Upload Documents - Attach spec sheets, photos, or service records
- View Service History - See all work orders that involved this part
Tips and Best Practices
Focus on High-Value Parts
Focus on High-Value Parts
- Expensive parts (compressors, motors, control boards)
- Warranty-tracked components
- Parts with predictable failure patterns
- Safety-critical components
Document Replacement Reasons
Document Replacement Reasons
- Normal wear/end of life
- Unexpected failure
- Upgrade or improvement
- Damage (lightning, corrosion, accident)
Photo Documentation
Photo Documentation
- Nameplate with model/part number
- Serial number label
- Physical condition
- Installation location
Track Original vs Aftermarket
Track Original vs Aftermarket
Link to Inventory
Link to Inventory
- Automatic reordering when stock is low
- Better cost tracking
- Faster emergency replacements (parts already in stock)
- Improved cash flow management
Plan Ahead for Obsolescence
Plan Ahead for Obsolescence
- Manufacturer support end dates
- Availability of replacements
- Compatible upgrade options
Use Parts Data for Preventive Replacement
Use Parts Data for Preventive Replacement
Leverage Warranty Coverage
Leverage Warranty Coverage
- Asset level (whole unit warranty)
- Part level (component warranty)
Common Questions
Do I need to create asset part records for everything?
Do I need to create asset part records for everything?
- Expensive parts
- Frequently replaced items
- Warranty-tracked components
- Parts with independent service schedules
Should I create a new part record when I replace a component?
Should I create a new part record when I replace a component?
How do I track parts that have been replaced multiple times?
How do I track parts that have been replaced multiple times?
- Date of each replacement
- Reason for replacement
- Cost and labor hours
- Who performed the work
Can I move a part from one asset to another?
Can I move a part from one asset to another?
What's the difference between Asset Status and Part Status?
What's the difference between Asset Status and Part Status?
How do I handle parts that are refurbished or repaired?
How do I handle parts that are refurbished or repaired?
- Date repaired/refurbished
- What was done
- Cost
- Expected remaining life after repair
Should I track serial numbers for all parts?
Should I track serial numbers for all parts?
- Manufacturer requires serial numbers for warranty claims
- Part is expensive and worth individual tracking
- Component has recall or safety concerns
How do I use parts data for inventory management?
How do I use parts data for inventory management?
- Fast-Moving Parts - Replaced frequently (quarterly/semi-annually): Keep in stock
- Slow-Moving Parts - Replaced annually or less: Order as needed
- Emergency Critical - Rare failures but critical when they happen: Consider stocking one spare
What are checklists and how do I use them with parts?
What are checklists and how do I use them with parts?
- Recurring inspections (monthly generator checks, quarterly compressor inspections)
- Safety-critical components requiring documented inspections
- Warranty compliance (some warranties require documented maintenance)
- Training new technicians (checklists ensure consistent procedures)
What is the History/Audit Trail feature?
What is the History/Audit Trail feature?
- When the change was made (date and time)
- Who made the change (user name)
- What section of the record was changed
- Which specific field was modified
- The previous value and new value
- Compliance and regulatory audits
- Investigating equipment problems (what changed before performance declined?)
- Accountability (who authorized part replacements or changes?)
- Training (see how experienced technicians handle situations)
Can I see who changed a part's information?
Can I see who changed a part's information?