Configuring your Wizard
Head over to “Wizard Config” in the Menu. There you can select which sections and fields shall be visible or mandatory.
Settings Section & Fields
- Visible: Controls whether a field is shown in the wizard.
- Mandatory: Defines whether a field is required before the user can proceed.
- Next Lookup: Defines whether the field is used to drive dependent field logic and opens the next pop up.
| Field | Visible | Mandatory | Next Lookup |
|---|---|---|---|
| Customer Information | ✔ | ||
| └─ Customer | ✔ | ✔ | ✔ |
| └─ Customer Contact | ✔ | ✔ | ✔ |
| └─ Location | ✔ | ✔ | ✔ |
| └─ Location Contact | ✔ | ✔ | ✔ |
| └─ Customer Ref no. | ✔ | ✔ | |
| └─ Address | |||
| └─ Street | ✔ | ✔ | |
| └─ Zip Code | ✔ | ✔ | |
| └─ City | ✔ | ✔ | |
| └─ GPS Location | ✔ | ✔ | |
| Overview | ✔ | ||
| └─ Branch | ✔ | ✔ | |
| └─ Request Name | ✔ | ✔ | |
| └─ Request Type | ✔ | ✔ | |
| └─ Request Service Object | ✔ | ✔ | |
| └─ Request Priority | ✔ | ✔ | |
| └─ Start Planned Date / Time | ✔ | ✔ | |
| └─ End Planned Date / Time | ✔ | ✔ | |
| └─ Request Description | ✔ | ✔ | |
| └─ Request Attachment | ✔ | ✔ | |
| Request Assignment | ✔ | ||
| └─ Request Technician Assignment | ✔ | ✔ | |
| └─ Request Vehicle Assignment | ✔ | ✔ | |
| └─ Request Tool Assignment | ✔ | ✔ | |
| Complaint | |||
| └─ Templates | ✔ | ✔ | |
| └─ Name | ✔ | ✔ | |
| └─ Planned Date | ✔ | ✔ | |
| └─ Type | ✔ | ✔ | |
| └─ Description | ✔ | ✔ | |
| └─ Service Object | ✔ | ✔ | |
| └─ Technician Assignment | ✔ | ✔ | |
| └─ Vehicle Assignment | ✔ | ✔ | |
| └─ Tool Assignment | ✔ | ✔ | |
| └─ Time & Materials | ✔ | ✔ | |
| └─ Checklist | ✔ | ✔ | |
| └─ Attachment | ✔ | ✔ | |
| Creation Path | |||
| └─ Creation Service Request | ✔ | ||
| └─ Creation Quote | ✔ | ||
| └─ Creation Work Order | ✔ |
Wizard Settings (Tenant-wide Configuration)
This section defines global behaviour for how the wizard behaves, how fields are pre-filled, and how data is mapped when creating or processing records. It controls both user experience (UX behaviour) and system automation rules.1. Name Template
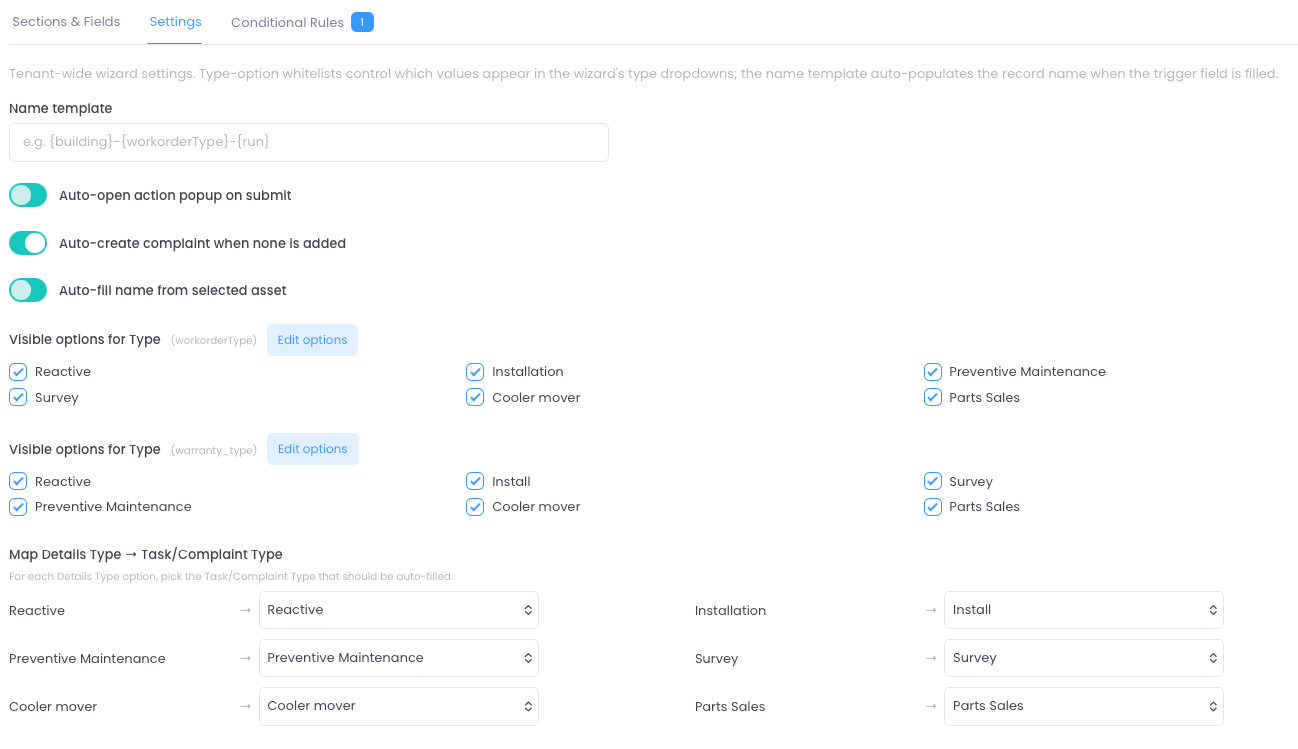
- Uses placeholders from selected fields
- Automatically populates the record name when key fields are filled
- Ensures consistent naming across all created records
Warehouse-Installation-001Berlin-PM-Weekly-12
2. Auto-open action popup on submit
When enabled:- After submitting the wizard, an action popup is automatically opened
- Allows the user to immediately continue with next steps (e.g. assign, schedule, create follow-up actions)
3. Auto-create complaint when none is added
When enabled:- If no issue/complaint is manually created during the process
- The system automatically creates a default complaint/issue record
4. Auto-fill name from selected asset
When enabled:- The record name is automatically generated based on the selected Service Object / Asset
- Reduces manual input
- Improves naming consistency in asset-based workflows
5. Type Visibility (workorderType / warranty_type)
These sections define which service types are available in the wizard UI.Work Order Types
Controls which options are visible when creating a work order, the field values are being taken from Dynamic Fields setup. 👉 Only selected types appear in the dropdown for usersWarranty Types
Controls which types are available under warranty-related flows, the field values are being taken from Dynamic Fields setup. This allows different type sets depending on business context (standard vs warranty work)6. Type Mapping (Type → Task / Complaint Type)
This section defines automatic classification mapping. It maps a selected Type to a system-defined Task or Complaint Type, this is used when your types differ between Task and ComplaintsPurpose of this mapping
When a user selects a Type:- The system automatically assigns the correct internal classification
- Ensures consistency in reporting, SLA handling, and workflows
- Eliminates manual tagging errors
Overall Summary
This configuration controls three main areas:1. Automation
- Name generation
- Auto creation of follow-up records
- Auto-open actions after submission
2. UX Control
- Which types are visible per workflow
- How dropdown options behave
3. Data Consistency
- Automatic mapping of types to internal system categories
- Standardisation across work orders, complaints, and service processes